Tag Archives: piecing

Quilting Survives The Holidays

Standard
Quilting Survives The Holidays

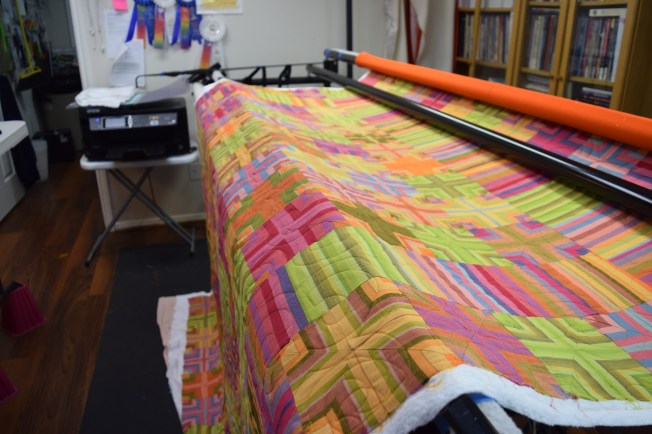
Or, maybe I should say, “the quilter survived the holidays” and is back to a more normal workday.  The latest quilt off the table belongs to Roberta A.  She is a big fan of K. Fassett patterns and fabrics.  I really love these fabrics she used in this great quilt!

DSC_0003 (1)

I did throw in a Quilts of Valor quilt.  It turned out really well with a rather heavy patriotic design by Nancy Haacke.  I used royal blue Glide thread on the top with a matching bottom line on the bottom.  I love working with the red/white/blue color scheme!

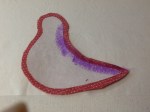
It is the 7th day of the 365 Challenge for one block per day.  Actually, since this challenge originated in Australia, it is the eight day of the challenge.  So far so good, maybe not one per day but I am caught up with the blocks so far.  I was concerned about the color values but a black/white picture of the finished quilt shows that the border we are working on is very dark and the value comes into effect when put next to the light colored blocks.  The blocks, although 3″ square, are really simple!  Go to http://www.365challenge.com.au if you are interested in joining the fun.  She also has a facebook page.  Here are the simple blocks we’ve constructed up until now.  You can see what I mean by the values.  I choose browns and DSC_0004 (1)creams since my stash is overflowing there.  We shall see…..

Happy Quilting….Karen


Advertisement

Keeping Me Busy!

Standard

I have been working on customer quilts and have a few pictures to show. The first “pile” of yellow dog toysis left over strips of fleece that I braided into pull toys for dogs.  I will give them to family dogs and take the rest to the shelter.  They were just the selvage edges that I cut off before finishing the edges of the blankets for a dance team.  The second picture is a delightful wall hanging, meant to hang on a high wall in a stairwell.  Joyce did a great job of designing this.  The last is a quilt made by Mary.  It has the cutest embroidered blocks.    Back to work for today.  I have a king size quilt on the long arm, 102″ x 96″

BE HAPPY…Karen

Joyce Wall hanging in progressMary A overall qult pic

WORKSHOP PROJECT ALMOST DONE!

Standard

Drunkards Path close up

Drunkards Path quilt

This quilt top came from a workshop with Ebony Love and the Coastal Prairie Quilt Guild of Missouri City, Texas. We had the opportunity to work with Ebony and cut out Drunkard’s Path quilt blocks on an Accuquilt Studio machine supplied by Quilters Cottage in Richmond, Tx. It was a lot of fun and I was determined not to let all of the pieces sit in their little zip lock bags as usual. Sew….here is my version of a happy quilt made entirely with Drunkard’s Path blocks. The curved piecing went smoothly and it was great fun arranging, and re-arranging the blocks on my design wall. This will eventually be quilted and become a new table covering for my kitchen table. Bright colors remind me of Spring and Summer approaching.

TESTING A MACHINE APPLIQUE TECHNIQUE

Standard

I have been wanting to test this machine applique technique for a long time. I also have wanted to work on this quilt “Red Delicious” by Esther Alieu. It is all done in multiple red prints and I just love the finished product. That being said, however, I just don’t have the time to needle turn applique and have watched Sharon Schamber use this technique of applique on most of her award winning quilts. The pieces are prepared with a specific foundation and edge turned with Elmer’s Glue. Here is the biggy…using monofilament you machine stitch a very small blanket stitch around all edges. As a prep Sharon instructs you to wash all of your applique fabric but NOT the background fabric. After completing the machine stitching you soak the block – this disintegrates the foundation into a soft fibre – and let the block dry. The background fabric, because it has not been prewashed, will shrink just a tad and thereby pull the stitching under so that it is completely invisible. Thats how it’s supposed to work anyway. I will soak my block tonight and let you know tomorrow how it does. I hope the picture of the bird is close enough for you to see the stitching before it is soaked. On this bird I was experimenting with the stitching. I started with a simple zig zag stitch but wasn’t happy with the way the thread pulled to the top no matter what tension adjustments I made. I then changed to a very small blanket (1.0/1.0) and it looks lots better. We will see tomorrow…..

Meanwhile, off to lunch with some good friends and then to the local quilt shop to deliver a couple of quilts.

Until later, BE HAPPY!

Karen

MAKE IT PERFECT!!!

Standard

I’ve been busy all day finishing up costumes. Have one more to go and then, thank heavens, back to quilting! So looking forward to that.

Meanwhile, here’s a very neat technique you might try. When you really, really, really want all your points and intersections to match, or when you have fabric that just wants to stretch when you sew it, get out the Elmers glue. Credit for this technique goes to Sharon Schamber. When sewing your seams in a quilt put a very fine line of Elmers School glue (the liquid type-not the stick) down right along side the stitching line, put your two pieces together and press with a hot dry iron. Check everything for accuracy, open seam and re-glue if necessary, then stitch away with your 1/4 seam. Yes, it does take longer to do but you will have an absolutely perfect seam, no distortion anywhere on the fabric. I will certainly use this technique for any show quilts I would make. It will keep those seam lines straight and everything matching! SEW COOL!!!!! You will want to get a fine tip for the glue container. Remember the glue needs to be very fine and solid…not dotted.

BE HAPPY!!

Karen

An Iron – Finally!

Standard

P1030675 (2)favorite ironP1030676 (2)iron box

I must have at least 10 irons sitting around my studio or parked on a shelf in the closet.  I HAVE to have a great iron.  All along I have been a fan of steam -lots of it!!!!  Yes, I know using steam is discouraged but it helps satisfy my need for speed.  But, eventually they cry and spit up all over the place (yes the iron, not the baby!)  Well, this new iron is the BEST!!!!  Cheap, under $30.  No auto shut down, just the right size, gets hot enough for freezer paper.  No holes in the plate to leave marks (yup, its a dry iron so never any dripping issues).  My spray bottle of water and my can of starch are always close by.  I’m in love!!!!  I bought mine from Amazon.

BE HAPPY…..Karen